How To Recover Files After Factory Reset Laptop [MiniTool Tips]
Get link
Facebook
X
Pinterest
Email
Other Apps
This article focuses on how to recover files after factory reset. In addition, it introduces the ways to restore laptop to factory settings in different Windows operating systems, so people who want to recover lost files and who need to factory reset laptop but don't know how to do should read this.
Laptops are frequently used nowadays in life and work. You have to face the reality that the running speed & responding speed of a laptop decline rapidly. Thus why many people start to think of factory reset. The factory reset will do good job in useless file deletion, configuration resetting and fixing disk errors. However, it may also bring you some troubles if you don't have a backup of your data (at least the important data).
Under this circumstance, I noticed the importance of data recovery after factory reset. Therefore, I decide to focus on two aspects in this article:
The steps to recover files after factory reset
The methods for restoring laptop to factory settings in different Windows operating systems
A Specific Case of Losing Files
My wife reset our old laptop to factory settings before we gave it away. She has now discovered that she has not transferred 6 months off videos from our daughter's lives which were stored on the laptop. These were not backed up as I was away working. Is there any way we can recover these videos? The operating system was vista.SevenForums
Part 2 – Can You Recover Files after Factory Reset Laptop
In general, experienced users know that whether they can recover data after restoring laptop to factory settings depends on how the factory restore was done and what they have done after the reset. Indeed, no one can ensure you that he can help you recover data after factory reset for 100%. But, this is a chance; whether you want to recover photos after factory reset laptop or other kinds of files, you need to take measures immediately to maximize the data recovery possibility.
Note: You are highly suggested to STOP FURTHER CHANGES ONCE REALIZING DATA LOSS since data overwriting will lead to permanent data loss.
Most people know that the answers to questions like "can I get my pictures back after a factory reset" are definitely positive; what really bothers them is the question "how do I restore lost files from factory restore". Now, I am going to help you solve this problem.
First of all, you should get a professional tool to assist you do the recovery. MiniTool Power Data Recovery is a good choice.
You can use the trial edition (which is only suitable for disk scan and file preview) to experience its performance.
You can also get a license for a full edition directly (which can help you recover data in the real sense).
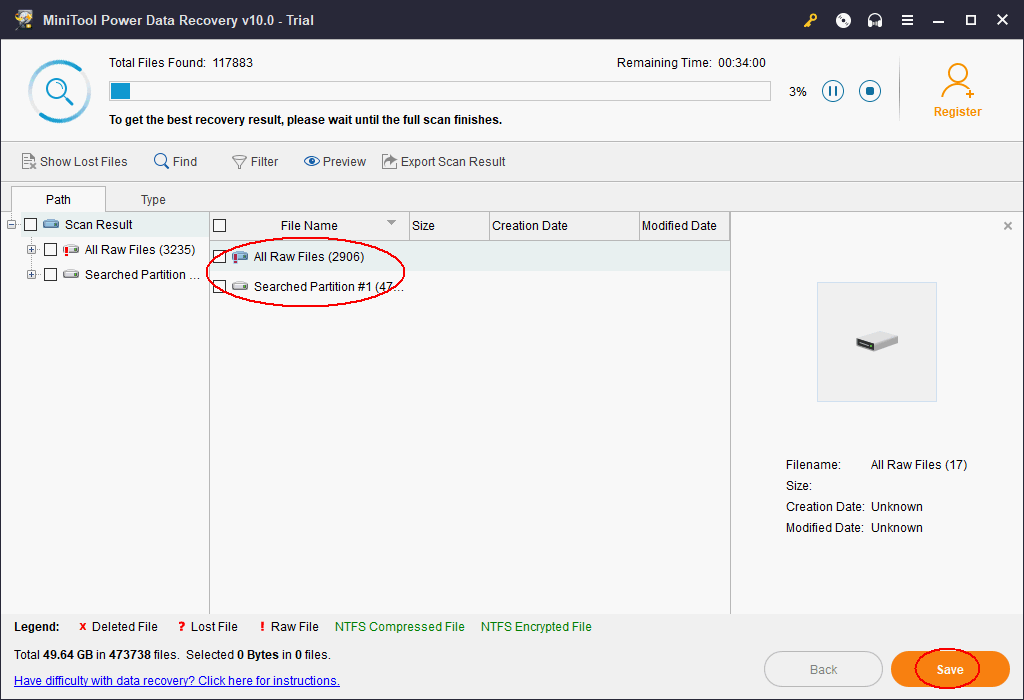
The following picture shows the main interface of the program, where 4 options are included. You need to select a suitable one according to your actual needs for laptop data recovery.
Step 1:
In the case where you need to recover data after factory reset, you should choose "This PC" as long as the partition including lost files still exists. Otherwise, you should choose "Hard Disk Drive".
Step 2:
Then, you should select the correct partition that contains lost files and perform a full scan on it by pressing the “Scan” button. Generally, you ought to select drive C:.
Step 3:
Finally, look through all found files to pick out the desired data and then save them to another device or partition by pressing the “Save” button. (This can be done during or at the end of the scan)
Please note:
You can preview a file before recovery by clicking on the “Preview” button if it is a picture/photo/txt file.
After seeing data recovery after factory reset, you may read following content to learn how to restore laptop to factory settings if you're interested.
Part 3 – How Do You Factory Reset A Laptop
Restoring to factory settings is the quickest and easiest way to bring your laptop back to normal, whether the system is running slow or caught a virus.
Here’s how to recover files deleted by virus attack:
However, how to restore laptop to factory settings bothers a lot of people. As far as I know, different computer systems require different ways to complete this task. Here, I will mainly take Windows 7, Windows 8 and Windows 10 as examples to show the reset process.
How to Reset Windows 7 Laptop to the Factory Settings
If you are running Windows 7 (or Windows Vista), you have two choices to perform a factory reset.
The first is to reinstall Windows from scratch, which isn’t a factory reset at all, unless you have all the original, factory-provided install media available. This method is a good way for users who want to permanently destroy all information saved on their laptop.
Alternatively, you can use a manufacturer-provided recovery tool and factory-provided recovery partition (most major computer manufacturers, like HP and Dell, provide recovery partitions on laptops and tablets in lieu of installation media.).
Here are common names for recovery software from each major PC manufacturer.
HP: HP System Recovery or Recovery Manager
Dell: Dell Factory Image Restore, DataSafe, Dell Backup & Recovery, and a variety of other names
Acer: Acer eRecovery or Acer Recovery Management
ASUS: ASUS Recovery Partition or AI Recovery
Lenovo: Rescue and Recovery, or ThinkVantage Recovery (on ThinkPads)
Sony: Sony Vaio Recovery Wizard
Note: If you are not sure whether your Windows 7 laptop has a recovery partition, check the user manual for your specific model. Besides, you can turn to Disk Management tool to know if your laptop has a built-in recovery partition: right click "Computer" in the Start menu, choose "Manage", and then select "Disk management". After that, you can see a list of drives as well as their partitions. Nevertheless, sometimes, the one you are interested in may not be called Recovery. In this situation, you should look at any partition that is 8-16GB in size and check its properties.
Here, I will take HP as well as Dell for example to show the detailed steps to reset Windows 7 laptop to the factory settings without a disc.
HP factory reset.
Step 1: Power off the computer and remove all peripheral devices. Then, boot the computer into Windows 7.
Step 2: Click on the "Start" button, and then click on the "All Programs".
Step 3: Click on the "Recovery Manager", and then click on the "Recovery Manager" option once again. The Administrator login prompt or User Access Control dialog box may display. Click on the "Yes" button in the UAC dialog box to continue, or type the administrator password, and then click on the "OK" button to log in as an Administrator. The Recovery Manager main screen opens.
Step 4: Click on the "System Recovery" option in the left column. The "Restore Your Computer To Its Original Factory Condition" screen opens.
Step 5: Click on the "Yes" radio button, and then click on the "Next" button.
Step 6: The laptop powers down and then reboots. When the computer boots again, the operating system and all default applications are restored to factory defaults.
Dell factory reset.
Step 1: Turn off the laptop and remove any attached devices. After that, power on it.
Step 2: When the Dell logo appears on the screen, press F8 several times to open the Advanced Boot Options menu.
Note: If the Advanced Boot Options menu doesn't open, wait for the Windows login prompt. Then restart the computer and try again.
Step 3: Use the Arrow keys to select "Repair Your Computer" and then press "Enter".
Step 4: On the System Recovery Options menu, select a keyboard layout and click on the "Next" button. Then, users can log in as a local user or the Administrator.
Note: Use the drop down menu to the right of User name: select the local user or the Administrator account and enter the password for that account. If you have not set up a password on the local user account, leave the password space empty and click on the "OK" button.
Step 5: Depending on the configuration, you may need to select "Dell Factory Tools", and then click on the "Dell Factory Image Restore" from the Dell Factory Tools menu. Click on the "Next" button to open the Confirm Data Deletion screen.
Step 6: Select "Yes, Reformat Hard Drive and Restore System Software to Factory Condition", and then click on the "Next" button.
Note: The restore process begins and may take five or more minutes to complete. A message appears when the operating system and factory-installed applications have been restored to factory condition.
Step 7: Click on the "Finish" button. The computer reboots.
Tip: Although recovery tool and recovery partition can help to perform a factory reset, all data and apps saved on the system partition (generally C drive) will be deleted. In this situation, if you want to get some data back, you can try MiniTool Power Data Recovery. However, the possibility of data recovery depends since new Windows files might overwrite the deleted data. If you find the files you want, please recover them at once.
How to Reset Windows 8 Laptop to the Factory Settings
Windows 8 lets users restore their laptop back to factory default settings, regardless of who made it or whether users have an install disc.
Step 1: Swipe in from the right edge of the screen, tap "Settings", and then tap "PC settings".
Step 2: Tap "General". Then, you will see three options including:
"Refresh your PC without affecting your files"
"Remove everything and reinstall Windows"
"Advanced startup"
Step 3: At this time, you can select a suitable one according to actual needs. After that, you will be given detailed operating prompts. Just do as told.
The first option reinstalls Windows and keeps personal files, settings, and any apps downloaded from the Windows Store. While this is not a full reset to factory settings, it's pretty close, and may solve performance problems with less inconvenience. Just click the "Get Started" button.>
If you choose the second option "Remove everything and reinstall Windows", all your data will be lost.
If you don't have a recovery partition or installation media, you can create an installation drive as long as you have a valid product key and a USB drive.
Note: If you turn to the first and second option, you need an active Windows Recovery Partition or installation media (a disc with a Windows installer on it).
How to Reset Windows 10 Laptop to the Factory Settings
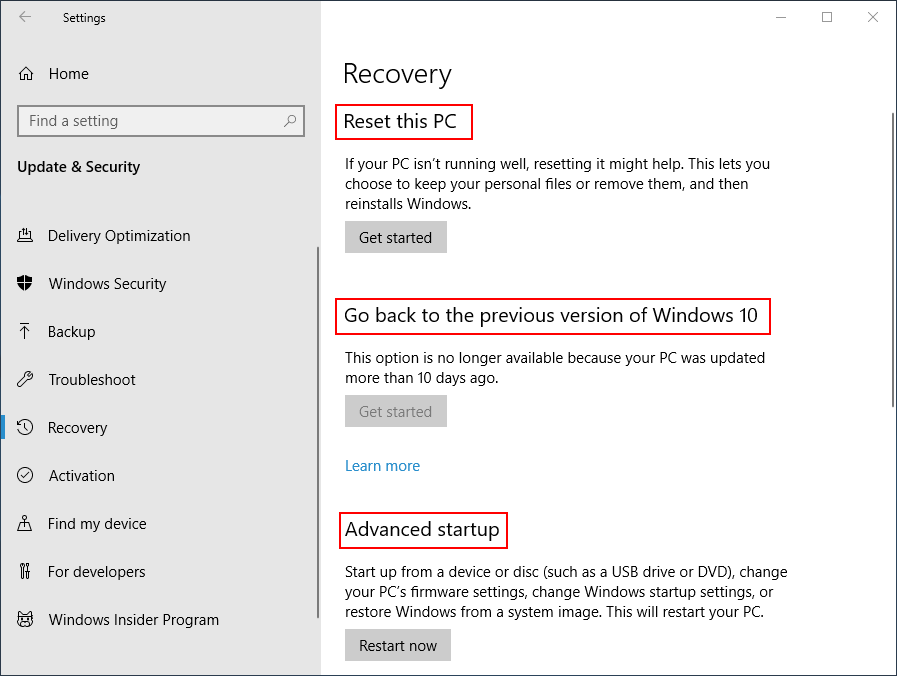
Step 1: Click on the "Start>Settings>Update & security>Recovery" button to see the following window, in which Windows presents you with three major options:
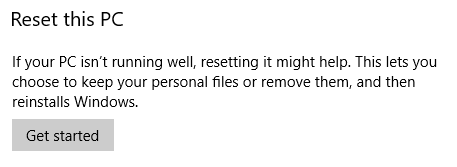
"Reset this PC"
"Go back to an earlier build"
"Advanced startup"
Tip: "Reset this PC" is the best option for starting fresh. "Go back to an earlier build" is made for Windows Insiders who want to roll back to a previous version of the OS. And "Advanced startup" lets you boot off a recovery USB drive or disc.
Step 2: Here, to reset Windows 10, you need to click on the "Get stated" button under the "Reset this PC".
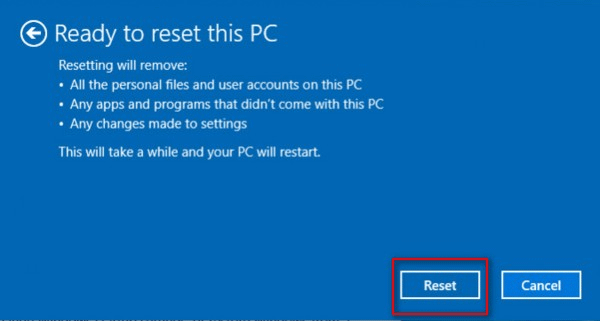
Step 3: In the following window, you can see two options ("Keep my files" and "Remove everything"). Here, you can click the first option to get the next operating interface.
Step 4: This interface displays a list of conventional programs installed on your computer (ones not installed from the Windows Store). This list will be saved to your desktop when you finish the recovery process. Click on the "Next" button.
Step 5: Click on the "Reset" button. Your PC will reboot automatically and begin the reset process. This might take an hour or more, so if you're using a laptop it's a good idea to plug in the power cord. It may reboot itself several times. Wait for Windows to restart and begin the setup process, then enter your personal information, log in, and begin setting up your refreshed PC.
After reading the simple introduction to data recovery after factory reset as well as how to restore laptop to factory settings, if you still want to reset your Windows to factory settings, the following tips may be useful.
Know clearly the reset options that will work for you the best
Part 4 – Conclusion
Do you want to factory reset your laptop when your OS is running slow or caught a virus? If yes, please backup all needed data in advance. Otherwise, your data will be lost.
If you only realize the importance of backup after the factory reset was done, you must want to recover files after factory reset. On this occasion, you should not ask questions like can you recover files after restoring to factory settings; instead, you should try MiniTool Power Data Recovery because it offers excellent performance as well as simple operations.
Have you ever suffered data loss disaster because of SD card errors? How to fix SD card errors? Here I will offer you various solutions to help you effectively solve 4 most common SD card errors (SD card unexpectedly removed, SD card is damaged, blank SD card, and read / write error on SD card) and retrieve important files and data from your SD card in an effortless way.
SD Card is a non-volatile memory card format, and it is commonly used in portable electronic devices (such as digital cameras, mobile phones, MP3 players, and so on) to store digital information. However, more and more users reported that they had encountered various SD card errors, but didn’t know how to solve, as shown below.
SD card unexpectedly removed.
SD card is damaged. Try reformatting it.
Read / Write error on SD card.
Blank SD card SD card is blank or has unsupported file system.
…
Have you ever encountered the above errors? Do you know how to fix corrupted or damaged SD card without losing data?
Now, in today’s post, I am going to introduce 4 most common SD card errors as well as corresponding solutions in order.
Solved - SD Card Unexpectedly Removed
My friend wrote to me: "I've got a problem with an error notification sporadically coming up saying 'SD card removed unexpectedly. Unmount SD card before removing…' as shown below."
Right here, to solve the SD card was unexpectedly removed error, you have to figure out what brings about the error, and then you can easily solve it.
Reasons and Solutions
1. SD card is damaged
When you receive the SD card removed unexpectedly error, the first thing you should do is to check whether the memory card is corrupted. Remove the SD card, and then connect it to another new machine. If you still cannot access the SD card, it might be corrupted or damaged. The only solution is to transfer its data at first and then change a new SD card.
2. SD card is not formatted
Sometimes, the "SD card removed unexpectedly" issue is caused by the not formatted error. In this case, formatting this SD card will resolve this issue.
3. SD card has been infected with virus
If your SD card has been infected with virus, you may also receive the SD card removed unexpectedly error. In this situation, you can recover its data, and then run antivirus software to scan the card to remove virus.
Now, the bottom line here is: If we want to solve the SD card unexpectedly removed error without data loss, we need to recover its data at first.
Right here, you might be wondering:
"How do I find an effective solution to recover data from SD card?"
Want to know the best way?
How to Recover Data from Corrupted or Damaged SD Card
When it comes to corrupted, damaged, or formatted SD card data recovery, you can try using MiniTool Power Data Recovery. Released by a famous software development company based in Canada, this professional data recovery software can help to effectively recover data from corrupted, damaged and formatted hard drive, SD card, USB flash drive, and other storage devices without data loss.
Note: before launch Power Data Recovery, you need to connect your SD card to computer at first.
Look:
In the main interface of MiniTool Power Data Recovery, you can see 5 different data recovery modules. Now, to recover data from SD card which prompts "SD card removed unexpectedly, unmount SD before removing", you can tap Damaged Partition Recovery for this module is specially designed to recover data from damaged, formatted, and RAW partition. In a word, as long as the partition exists, you can try this module to recover lost data.
Then, select the SD card and tap Full Scan button to continue. Here, you can click Settings to specify needed file types as well as file systems. For instance, if you only want to recover pictures and videos, you can check Graphics & Picture as well as Audio & Video, as shown below.
After scanning, you will receive the following window. No, you are able to check all needed files, and then click Save button to store them on a safe place. Here, if you want to restore pictures, you can click the Preview feature to preview them before saving.
Note: If you want to recover data with this software, you should get its paid edition to break the limitation.
Sum up: MiniTool Power Data Recovery can easily and quickly recover lost data without bringing any damage to the original data.
Have you ever encountered the "SD card is damaged, try reformatting it" error? A true example is shown below:
My phone gave me the following message: "Damaged SD Card SD Card is damaged. Try reformatting it". I took out my SD card and place it back in. It worked fine but after about 30 minutes I got the same message again. Has anyone had this problem? Should I reformat my SD card or will I keep on having the same issue?…from androidforums.com
Warning: Don't format the SD card immediately. Otherwise, the original data on the SD card will be lost forever, and there is no way to recover them.
In general, to solve this problem effectively without losing data, you should find a suitable data recovery solution to transfer SD card data at first, and then format the damaged SD card.
MiniTool Power Data Recovery, a piece of green, simple yet professional data recovery software, is recommended here. By using this all-in-one tool, you can recover almost all lost SD card data as long as the lost file has not been overwritten by new data and file loss is not caused by hardware failure.
Video shows how to solve the "SD card is damaged, try reformatting it" error with ease.
"I cannot access data stored on my SD card as my system prompting Read/Write error message constantly. Do you know how to handle this problem? If yes, then please help me bring back the card to normal state"
Here, to solve the read/write error on SD card, you can try the following ways.
Solution 1: Check SD card physical components and its connection
Check the memory card reader and the device driver correctly. Connect SD card to another device to ensure that there are no compatibility issues.
Solution 2: Remove write protection
As we know, if the SD card is write-protected, you also cannot access its data. In this situation, you can read this post "How to Remove Write Protection on an SD Card" to know how to effectively solve this issue.
If the above 2 methods cannot help you, you can try the following ways.
Solution 3: Use chkdsk command
Although chkdsk command can help to identify and fix errors that are present on memory card, it has a big problem. Your SD card data will be lost after fixing this error.
Therefore, before running chkdsk command, you had better transfer its data out.
Method 4: Format SD card
If you still cannot use your SD card, you can try formatting it. However, before formatting, you had better restore all important data for formatting will wipe out all existing data on the SD card.
Sum up: to solve the "read / write error on SD card" without data loss, you had better transfer its data out, and then try removing its write-protection, or running chkdsk to fix errors, or formatting SD card.
And, MiniTool Power Data Recovery can effectively recover data from SD card with Read/Write error. You just need to launch this software, and then select a suitable data recovery module. To be specific, Damaged Partition Recovery can recover data from damaged, formatted and RAW drive; Lost Partition Recovery can recover data after partition loss; Digital Media Recovery can quickly recover videos, photos, and music; Undelete Recovery can recover deleted data quickly.
After selecting a data recovery module, you will be given detailed operating prompts. Just do as told.
When it comes to SD card errors, we have to talk about this error "Blank SD card SD card is blank or has unsupported file system". If you visit some forums like Windows forum, you will find many people are talking about the blank SD card issues. A true example is shown here:
I recently formatted my Samsung Galaxy S5 as I wanted it to be factory reset. Before doing this I backed up all my images to my 64gb micro SD card, which has been used in my phone since I got it (almost a year ago). The SD card has been working fine since I got it. However after factory resetting my phone, my SD card doesn't work. I try to mount it and it says "SD Card is blank or has unsupported files". It gives me the option to format it however I don't want to since all my images are on there. Any fix?…from tomshardware.com
Have you ever encountered blank SD card? Do you know how to solve the "SD card is blank or has unsupported file system" error without data loss. In general, if your SD card is blank, don’t panic and you can find 7 different solutions to remove the blank SD card error as long as you read this post: 7 Solutions: SD Card Is Blank or Has Unsupported File System.
Alternatively, you can watch the following video to know how to solve this issue quickly and effectively.
Thus, 4 most common SD card errors as well as corresponding solutions are nearly closed. Of course, not all SD card errors are shown here. For instance: You cannot normally use your camera and receive an error message "SD card is not accessible. The file or directory is corrupted and unreadable."
In a word, no matter what error you encounter, if you want to fix corrupted or damaged SD card without affecting the original data, you should transfer its data out at first, and then take some suitable ways to remove error.
Conclusion
After seeing the above 4 most common SD card errors, I guess you might have a basic understanding of how to effectively deal with SD card errors without damaging its original data.
And here, I want to emphasize SD card data recovery again. If you cannot access your SD card, the first thing you should do is to transfer its data out. And, MiniTool Power Data Recovery is an excellent choice for you to recover lost data because of its powerful functions, simple operation and high security. Hurry to download it and have a try. I bet it will surprise all of you.
Like this post, share it to help more users.
Should you have any question or any ideas about the 4 common SD card errors and how to recover data from damaged or corrupted SD card, you can leave it in the following command bar or directly send email to support@minitool.com. Thanks in advance!
Are you still troubled by the issue 'hard drive not showing up'? This article will show you how to slove the probelm 'hard drive not showing up'. In addition, the issue 'hard drive not showing up' may lead to data loss. But, don't worry! MiniTool Power Data Recover, a piece of profesional data recovery software, can help you to get the lost data back.
Hard drive containing massive important data is not showing up in My Computer or Windows Explorer? Have you ever encountered this problem?
It is believed that many users have encountered the situation mentioned above. Let's see a true example from answers.microsoft.com:
My 2nd hard drive isn't showing up in my computer. The hard drive was a slave I took out of my old XP machine after it crashed. I had installed it into my new vista machine before and it was working, but then I had to reinstall the OS and ever since then it has not shown up. I have double checked to make sure it was set as a slave drive and it is. It shows up in the Bios, the device manager, and in Disk Management, just not in my computer. Nothing is showing up as unallocated in disk management and the drive says it's healthy. In the device manager it says the device is working properly. I've tried to just give it a drive letter in disk management, but when I right click on it the only option I have is help. I've also tried to update the drivers, and it says they are up to date. I've tried disabling and enabling the hard drive. I've even tried uninstalling it. When I restarted it did detect it and reinstalled the drivers, but I still can't get it to show up in my computer.answers.microsoft.com
Why does hard drive (including external hard drive or, USB hard drive) not show up in My Computer or Windows Explorer? Do you know how to deal with this issue? Besides, can we recover data from hard drive when it is not showing up?
Want to know answers of these questions? Here we are!
Why Hard Drive Isn't Showing up and How to Fix
According to the questionnaire survey and the result of experiment, we find there are many factors that can cause the "hard drive not showing up" issue, including mistaken operation, computer virus invasion, and hard drive letter missing, and so on.
Let's discuss the details.
Case 1- Hard Drive Is Not Initialized
As we know, once hard drive shows as uninitialized, we are unable to see it in Windows Explorer, and cannot access its files. And many reasons (such as virus invasion, master boot record corruption, bad sectors, and so on) can lead to disk not initialized issue.
Solution
To solve this issue, you can right-click the uninitialized disk, and then choose Initialize Disk to initialize it to use it again.
Note: During initializing process, you will be asked to initialize to MBR disk or GPT disk, as shown below. In this case, you can choose appropriate partition style according to actual needs. (Here, I guess, you might be interested in this post "How to Convert MBR to GPT without Data Loss in Windows 7" since it not only explains what are GPT disk and MBR disk but also shows how to convert MBR disk to GPT.)
If your disk is not initialized anymore due to sudden change, we don’t suggest you to initialize the disk immediately. Conversely, you had better recover all your missing data from it, and then initialize it to make it usable again. Otherwise, the original data will be lost forever. Here, if you don't know how to perfectly recover lost data, you can try using MiniTool Power Data Recovery because of its excellent performance, simple operation and high security.
A drive letter is a single alphabetic character A through Z that has been assigned to a physical drive or drive partition in the computer. And if you want to see your hard drive in My Computer or Windows Explorer, you should assign it with a drive letter. Once the drive letter is missing, you will encounter the "hard drive not showing up" issue.
Solution
To solve this problem, you can assign a drive letter for it. Windows built –in disk management as well as partitioning software like MiniTool Partition Wizard can help to add a new drive letter on it. Click here to learn several ways to get missing drive letters back in Windows.
Case 3 – Hard Drive Is Hidden
Now, some users want to turn to third-party software like MiniTool Partition Wizard to hide their hard drive to protect data. However, once accidentally hide a drive containing massive important data, what should we do since this drive isn't showing up in Windows Explorer?
Solution
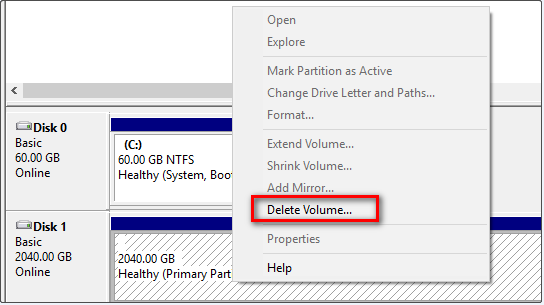
If drive is hidden by mistake, what should we do since Disk Management only offers Delete Volume feature as well as Help feature, as shown above? Can we delete the hidden volume, and create a new one? Of course, we can! But, this method will cause data loss.
Warning: You had better recover data from the hidden drive before deleting it to create a new one.
Note: Alternatively, you can try using MiniTool Partition Wizard to show hidden hard drive in Windows without losing data because this tool can help you hide/unhide drive conveniently and safely.
Case 4 – Hard Drive Becomes Unallocated
Let's start with a true example:
My external USB 3.0 HD was working perfectly well yesterday. However, today suddenly became an "unallocated" drive without even a drive name. I'm able to detect the drive but I have no way of accessing it.
The only solution that I've tried so far is to access the HD with another computer. But, the results are the same with those computers. I haven't done anything else...
Here's a screenshot of the problem:
In this case, what should we do? Can we effectively solve this problem without losing original data?
Solution
If your hard disk space turns into unallocated, you are allowed to create new volume on this disk and make it appear in Windows Explorer. However, this solution will cause data loss forever.
In addition, you are highly recommended to recover data from unallocated drive ahead of doing anything else. MiniTool Power Data Recovery is recommended here since this all-in-one tool has been awarded as the top 10 data recovery software on TOPTENREVIEWS.
Case 5 - External hard Drive Is Not Recognized
There's also another situation where the hard drive (especially external hard drive like USB hard drive) is not showing up in My Computer or Windows Explorer. And, you will receive a warning that saying device not recognized.
Here, to fix the "external hard drive not recognized" error, you can try the below methods.
Method 1: Restart computer
Unplug your USB, restart your computer and plug in and see if it works now.
Method 2: Update device driver
Open Control Panel > Printers and devices. Check if you can see any entry for Unidentified USB device or Unknown Device. Open its Properties and update its driver, if an update is found to be available.
Last but not least, if your hard drive is partitioned with the wrong file system, you cannot see it in My Computer or Windows Explorer. For example, you may have formatted the drive with the ext4 file system from Linux or the HFS Plus file system from a Mac. Windows can't read these file systems. But, you can see this drive in Disk Management as shown below:
Solution
To solve this issue, you can delete this drive, and then create a new partition with the newer NTFS file system or older FAT32 file system so Windows will be able to recognize it.
Note: You are strongly suggested to recover data from the drive with wrong file systems at first. Otherwise the original data could be lost forever.
Here, we want to share another case to you.
Sometimes, you will find you cannot access your NTFS drive from another device, such as a DVD player, smart TV, game console, or media center device. This is because that many devices, even Microsoft's own Xbox 360, can't read the Windows NTFS file system. And, they can only access drives formatted with the older FAT32 file system. To fix this problem, simply convert it to FAT32.
After seeing why hard drive isn't showing up in Windows and how to fix this issue, let's move onto the next part.
Recover Data from Hard Drive Not Showing up
From the above description, we can see several factors can cause the hard dive or external hard drive not showing up issue. Although you can fix the "hard drive not showing up" issue according to the solutions we mentioned above, we advise you to recover data at first. Otherwise, the original data saved on the drive which is not showing up will be lost permanently. However, how?
You are probably wondering:
"How do I effectively recover data from hard drive when it is not showing up?"
Right now, MiniTool Power Data Recovery (PCWORLD, a professional IT magazine, speaks very highly of this data recovery software) can help you effectively recover lost data because of its powerful functions.
Now, let’s see the detailed steps.
Download MiniTool Power Data Recovery Trail edition.
Launch this professional tool to get its main interface as follows.
4 different data recovery modules are listed in the main interface of this all-in-one data recovery software.
This PC focuses on recovering lost or deleted data from damaged, RAW or formatted partitions. And this module is selected by default.
Removable Disk Drive is designed to recover lost photos, mp3/mp4 files, and videos from flash drives and memory sticks.
Hard Disk Drive can recover files after partition loss or deletion.
CD/DVD Drive helps to recover data from formatted or erased CD/DVD discs.
Here, you can click the Hard Disk Drive to recover lost data. After selecting this module, you will see the following window.
Now, select the target hard drive which is not showing up in Windows Explorer, and then click Scan button. In this window, you are able to click Settings to specify needed file systems as well as file types.
Wait for the full scanning finishes to get the best recovery result.
Finally, select all needed files, and save them. It is recommended to store needed files on another drive. Otherwise, the original data will be overwritten.
The trial edition of MiniTool Power Data Recovery can only scan lost data. If you need to recover more data, please choose the paid edition. Here, you might be interested in this post: MiniTool Power Data Recovery License Comparison.
Are you still worried about the "hard drive not showing up" issue? Now, after reading this post, I guess you might have a basic understanding of how to fix this issue.
Should you have any question or suggestion about the hard drive not showing up in This PC or My Computer, please feel free to send your email to support@minitool.com.
Have you ever encountered the situation where photos on SD card are not showing on computer when you are transferring photos from your SD card on to your computer? How can we fix this issue? Don't worry. You will find the solutions in this post. After reading this post, you will know how to effectively solve photos on SD card not showing on computer issue with ease.
I Can View Photos on My SD Card on the Camera but Not on the Computer
Q: Hello! I need help. I visited China last month and took lots of beautiful photos. However, when I connected the SD card to computer to copy some photos, I could not find these photos. In this case, what should I do?
Photos on SD card are not showing on computer is a very common question. If we browse forums and websites, we can find many users who have encountered this exact same issue.
Many computer users may want to know how they can effectively solve the issue of SD card not showing files on PC problem. They may also want to recover pictures on SD card that are not showing on computer as well.
As we know, this issue may be caused by various reasons such as bad card reader, virus invasion, hidden file, and many more. However, if our PC cannot recognize this card, we cannot view its files in File Manage. Now, this post may teach you ways to solve "SD card is not showing pictures on PC" issue.
Way 1. Try Using a Different Card Reader
If you can view photos on SD card on the camera but not on the computer, you can try using another card reader and see if you are able to see the pictures on computer. If the pictures appear in files, then there should be some problems with the previous card reader. If not, try the following solutions.
Way 2. Enable Hidden Files in Your SD Card
Sometimes, photos and other files on your SD card will be hidden, thus you cannot see them in your computer. Now, you can try the following steps to unhide the hidden files on your memory card.
Step 1: Click Start button.
Step 2: Type control panel in the search box.
Step 3: Switch the view to Category.
Step 4: Click Appearance and Personalization.
Step 5: Choose Show hidden files and folders in Folder Options.
Step 6: Check Show hidden files, folders, and drives.
Step 7: Finally, click Apply button.
Way 3. Remove Write Protection from SD Card
As we know, if your SD card is write protected, you cannot see its files in PC.
a) You firstly should check the card for a physical lock. Many SD cards, as well as USB drives, have physical lock switch that turns on write protection. So, make sure that the drive does not have this lock enabled. b) Sometimes, if your SD card is stuck in Read Only mode, you can fix its attributes using the Command Prompt.
Step 1: Press Start button.
Step 2: Go to Accessories.
Step 3: Right-click Command Prompt, and choose Run as administrator.
Step 4: Type diskpart and press Enter.
Step 5: Type list disk and press Enter.
Step 6: Type select disk X and press Enter. (Replace X with the number from the first column in the list for the SD card you want to perform commands for.)
Step 7: Type attributes disk clear readonly and press Enter.
Step 8: Type Exit and press Enter to leave this.
Watch the Following Video to Know More Ways to Disable Write Protection
If you still cannot see SD card photos on PC after trying the above 3 solutions, your SD card might not be recognized by File Manager. Now, try the following solutions to make computer recognize this card, thus you can see SD card pictures in PC.
Way 4. Remove Virus or Malware to Fix SD Card Not Showing up Issue
If you get a virus on your SD card, your SD card may be hidden. Now, you can try using CMD (command prompt) to fix this issue.
Step 1: Click Start button.
Step 2: Search command or cmd.
Step 3: Right-click or tap the Command Prompt search result, and choose Run as administrator.
Step 4: Type diskpart and press Enter.
Step 5: Type attrib -h -r -s /s /d drive letter:\*.*( for example,attrib -h -r -s /s /d k:\*.*) and press Enter.
Step 6: Finally, type Exit.
After that, you can check your SD card. If you still cannot find your photos, then I can recommend you a professional photo recovery software which can recover the pictures not showing on computer.
Now, I guess you might be wondering: "How to recover SD card pictures not showing in computer?"
MiniTool Photo Recovery, developed by MiniTool Software Ltd., is recommended here.
MiniTool Photo Recovery, a read-only and easy-to-use photo recovery software, is specialized in recovering deleted photos, pictures and images. By using this professional photo recovery software, you can effectively recover lost photos within 3 steps. In addition to SD card photo recovery, it also can recover files from different types of digital cameras and various storage devices including hard disk, USB disk, etc.
Note: Before recovering SD card photos not showing in computer, you should download MiniTool Photo Recovery from its official website, install it on computer, and connect your SD card to PC.
Step 1: Launch MiniTool Photo Recovery, and clickStart button on the main interface of this professional photo recovery software to start your photo recovery journey.
Step 2: Select the SD card, and then click Scan button at the bottom right.
In this window, you can use the Setting feature to specify needed files before scanning. For instance, if you only want to recover JPG, PNG and BMP pictures, you can choose JPEG Camera File (*.jpg), JPEG Graphics file (*.jpg), PNG Image(*.png), and Bitmap Image (*.bmp), as shown below.
Step 3: Preview photos, check all needed photos and save them on a safe place. It may be better for you to store needed photos on another drive.
Watch the following video to know more information about photo recovery and this professional photo recovery software.
Note: The unregistered MiniTool Photo Recovery can only recover 200MB files. If you want to recover more, you should choose the paid edition.
Step 1: Hold the Windows key as well as the R key to open the Run dialog box.
Step 2: Type devmgmt.msc and press Enter key.
Step 3: Click Disk drives.
Step 4: Right-click your SD card, and choose Uninstall and click OK button.
Step 5: Then, right–click another drive (for example, here, we can right-click WDC WD5000AAKX-22ERMA0 ATA Device), and then choose Scan for hardware changes to refresh the drives.
Way 6. Use Disk Management to Make SD Card Show up
If you still cannot see your SD card as well as its files, you might try to run Disk Management tool to make it to show up in PC and run CHKDSK command to fix internal errors.
The following steps provide details on making SD card show up.
Step 1: Right-click My Computer or This PC.
Step 2: Click Manage.
Step 3: Click Disk Management and then find the device in the drive viewer.
Step 4: Press Win + R.
Step 5: Type cmd and hit Enter.
Step 6: Type chkdsk Drive Letter: / F and hit Enter. (For instance, we type chkdsk K:/F.)
Step 7: Type Exit and press Enter.
Way 7. Format the SD Card Whose Photos Are Not Showing in PC
Here, if all the previous approaches don't work, you can try formatting this SD card to solve "SD card is not showing pictures on PC".
Note: formatting will delete all files on this SD card. Therefore, before you format SD card on computer, you should find a way to recover missing photos. Now, don't worry, MiniTool Photo Recovery, a read-only professional photo recovery software can help you easily and quickly recover pictures on SD card not showing on computer.
Step 1: Recover SD card pictures not showing in computer
1) Click Start button on the main interface of MiniTool Photo Recovery.
2) Scan the SD card. (If you have scanned this card, you can directly select the Previous Recovery Result and then click Load button to directly load the scanning results.)
3) Save all needed files. (if a lot of found files are listed in this window, you can use the Filter feature to quickly find needed files. To be specific, you can choose *.jpg,*.gif,*.png,*.psd,*.tif from the drop-list of By Filename/Extension, and then click OK button, since you only want to recover pictures.)
After saving all needed files, you can format this SD card.
Step 2: Format SD card
When it comes to formatting hard drive, you can try using a professional and free partitioning tool, MiniTool Partition Wizard.
1) Connect memory card to PC.
2) Download and install MiniTool Partition Wizard on computer.
I am very impressed with your post because this post is very beneficial for me and provide a new knowledge to me https://vstcyberpc.com/foxit-phantompdf-crack/ https://vstcyberpc.com/genesis-pro-vst-crack/ https://vstcyberpc.com/minitool-power-data-recovery/ https://vstcyberpc.com/uad-ultimate-9-bundle/
Great concept and great effect, This was a really good experience, I'm going to get straight to the point, THE software was great.https://thepcsoft.com/mirillis-action-crack-serial-key-latest/
OILY SKIN Toggle navigation Home » Skin Care » Glowing skin 25 Best Fairness Tips For Oily Skin Medically reviewed by kailash dhiman. Fact Checked If you have oily skin, you are well aware of its woes. Acne, pimples, blemishes, excessive shine in your T-zone – these issues often make your skin dull and lifeless. I know this. And I also know that you secretly desire even, glowing, bright, and healthy skin. The good news is, that is precisely what I am going to discuss here today. No. I will not promise that the tips I am going to discuss here will make you the “fairest of all” overnight or with continuous use. But I can assure you that they will definitely help brighten up your face and restore your original skin tone. And you will not stop admiring yourself in front of the mirror. So, here we go! Quick And Easy Fairness Tips For Oily Skin If you are tired of trying the brightness and fairness creams ava...


I appreciate the fact that you have the knowledge to fix the problems and deliver the best results. Excellent work!
ReplyDeletelaptop data recovery
How To Recover Files After Factory Reset Laptop [Minitool Tips] >>>>> Download Now
Delete>>>>> Download Full
How To Recover Files After Factory Reset Laptop [Minitool Tips] >>>>> Download LINK
>>>>> Download Now
How To Recover Files After Factory Reset Laptop [Minitool Tips] >>>>> Download Full
>>>>> Download LINK 2h
Appreciation is a wonderful thing...thanks for sharing kepp it up. Azkapc.com
ReplyDeleteAny Video Converter Ultimate Crack
Quick Heal Total Security Crack
NordVPN Crack
MiniTool Power Data Recovery Crack
MATLAB R2020b Crack
solveigmm-video-splitter
ReplyDeleteThanks for sharing this kind of information.minitool
ReplyDeleteI am very impressed with your post because this post is very beneficial for me and provide a new knowledge to me
ReplyDeletehttps://vstcyberpc.com/foxit-phantompdf-crack/
https://vstcyberpc.com/genesis-pro-vst-crack/
https://vstcyberpc.com/minitool-power-data-recovery/
https://vstcyberpc.com/uad-ultimate-9-bundle/
All kinds of apps are available here. Visit my site.
ReplyDeleteI hope it will prove helpful for you.
Good Work! Keep It Up.
It's An Amazing Site.
MiniTool Power Data Recovery Crack
IObit Malware Fighter Pro Crack
Advanced System Repair Pro Crack
IDM Crack
Tenorshare 4uKey For Android Crack
Wondershare Recoverit Crack
WinRAR Crack
Great job on the hard effort you've put in. I appreciate it and thank you for sharing it..
ReplyDeleteMiniTool Power Data Recovery Crack
How To Recover Files After Factory Reset Laptop [Minitool Tips] >>>>> Download Now
ReplyDelete>>>>> Download Full
How To Recover Files After Factory Reset Laptop [Minitool Tips] >>>>> Download LINK
>>>>> Download Now
How To Recover Files After Factory Reset Laptop [Minitool Tips] >>>>> Download Full
>>>>> Download LINK f7
Great concept and great effect, This was a really good experience,
ReplyDeleteI'm going to get straight to the point, THE software was great.https://thepcsoft.com/mirillis-action-crack-serial-key-latest/